Manual entry is a time-consuming, laborious, and thankless task. In this blog, we’ll delve into the importance of importing data into Sage 200, both Standard (STD) and Professional (Pro) versions, and how it can save you the from rigors of manual entry.
We’ll cover everything from understanding the templates required for successful data imports to the step-by-step import process, validations, and error corrections.
This blog will serve as a valuable resource for users who wish to fully utilise Sage 200 for bulk data updates and transactional data imports efficiently!
Why Import?
Importing data into Sage 200 is crucial for several reasons beyond the initial creation of companies. As a user, you’ll find that importing data is highly beneficial for bulk updating of existing data such as customer and supplier contact details, and addresses, making accounts inactive, or hiding nominal codes en masse.
Importing is not only limited to standing data but is also invaluable for transactional data, including supplier transactions, customer transactions, and nominal balances. This can significantly save time and improve accuracy by avoiding manual data entry. Furthermore, importing stocks and Bills of Materials (BOMs) en masse can streamline inventory management and production planning, making Sage 200 a versatile tool for businesses of all sizes.
Sage 200 Import
Importing Data in Sage 200 Standard
Sage 200 Standard (STD) provides a straightforward method for data importation. You can find the import functionality under Import Records. Sage 200 Standard differentiates import files with an “STD” suffix, in case you need to differentiate between Standard and Pro files. This is due to certain fields potentially existing in one and not the other.
Users can access help files directly within the software, which guides them on how to structure these files and provides detailed information on each data field. The import wizard in Sage 200 Standard simplifies the process by guiding users through each step, making it user-friendly even for those who are not particularly tech-savvy.
Importing Data in Sage 200 Professional
Sage 200 Pro offers more comprehensive import capabilities than Standard. Users can find imports in each module as opposed to a specific import section.
Sage 200 Pro supports importing a wide range of data, including:
- Purchase Ledger
- Sales Ledger
- Nominal Ledger
- Stock
- Price Book
- Bill of Materials
However, it’s important to note that importing Cash Book, Sales Order Processing, and Purchase Order Processing data directly into Sage 200 Pro is not possible without third-party software. Solutions by Sicon, Codalis, and Draycir are available; if you’d like to discuss these options please contact your CRM.

Working with Excel for Data Imports
Using Excel Templates
Excel is used to prepare data for import into Sage 200. Sage have provided for each import very useful example files (.xls) that detail everything required for the import to validate, including mandatory fields, field length, formatting, etc. This allows you to determine not only what the program requires, but what is available to you for the import and what you may wish to include. A common practice is to use the example file to add data and then copy this across to the proper import file.

The import file itself is in the form of a .csv file. As we all know Excel can be temperamental, more so when it comes to .csv files, as it often reverts to its default configuration, affecting column formats, leading zeroes, etc. These can lead to failed validations for importing therefore make sure you properly…
…Prepare Import Files
When preparing import files, it’s crucial to understand how copying and pasting data can affect validations, whether copying from the example file or another source. Using the correct paste options (Keep Source Formatting) is essential to preserve the format of the data, particularly for columns containing numbers with leading zeros or specific date formats.
Common mistakes include losing leading zeros, which Excel tends to drop automatically. This issue often arises when importing report categories and nominal codes during nominal ledger imports but can include Customer and Supplier records. A good practice is to format these columns as text to prevent Excel from removing these zeros.
The Import Process
Demonstrating Successful Imports
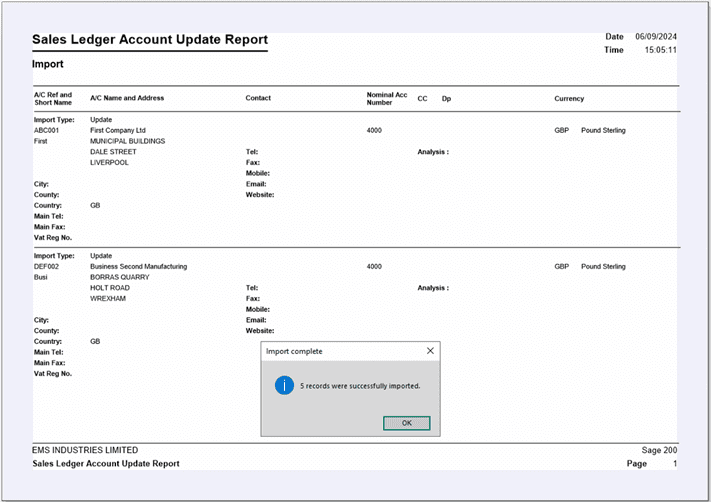
Let’s walk through a successful import scenario to demonstrate the process. First, we’ll import customer data using the Customer Import template. Once the data is correctly formatted and validated, the import will proceed without errors, and the new customer records will appear under the customer listing in Sage 200:
Next, we’ll perform a Customer Transactions Import. After importing, the transactional data can be seen in the transaction inquiries section, confirming that the data has been successfully imported:
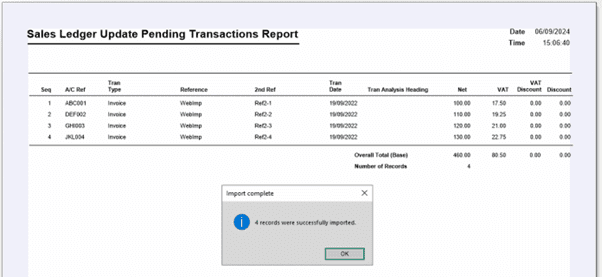

These examples showcase how straightforward and efficient data imports can be when using correctly formatted files and adhering to Sage 200’s requirements.
Understanding Validation and Correcting Errors
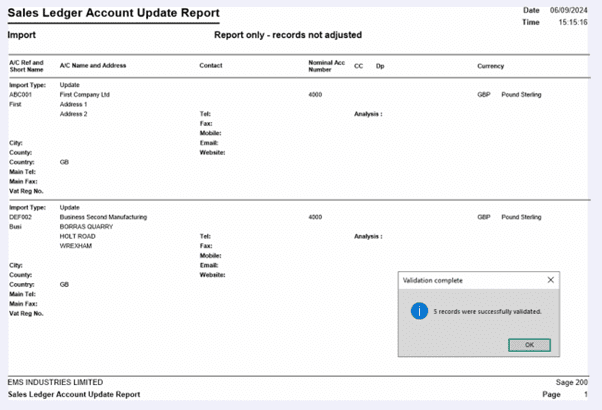
Not all imports go smoothly, and errors are a common occurrence. Let’s explore a few examples of unsuccessful imports and how to resolve them. In one instance, we might attempt to update customer records with new address information, but the validation process fails because the CountryCode is missing or incorrectly formatted:
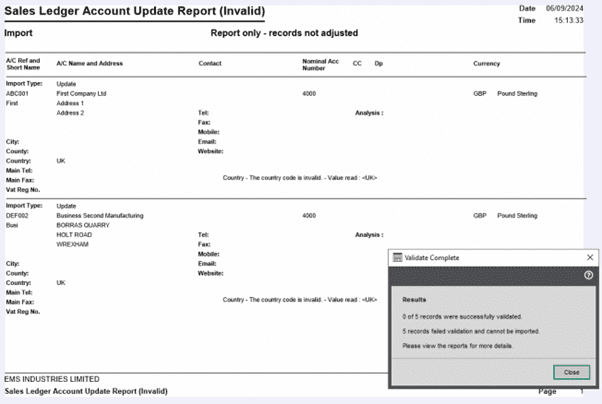
For UK-based records, the CountryCode and Country need to be specified as “GB”. After correcting these fields and re-running the validation, the import will proceed successfully:
Common Errors & Import File Examples
Common Errors
You’ve seen how errors can validate when failed, let’s run through some common messages you may come across and how to avoid them:
Incorrect File Format
Issue: Sage 200 requires data to be in a specific format: .csv or .xls. If the format is incorrect or the data is not structured properly, the import will fail.
Solution: Ensure the data is in the required format with correct column headers, data types, and structure.
Missing or Invalid Data
Issue: Key fields like account numbers, dates, or transaction amounts might be missing or invalid.
Solution: Check the data file for completeness and validity. All mandatory fields should be filled, and data types should match the system requirements, and if you’re pasting data from another source make sure it’s into the correct columm.
Account Code Errors
Issue: The account codes in the import file may not match the codes already set up in Sage 200.
Solution: Ensure that the account codes in the file correspond to valid, existing codes in Sage 200.
Duplicate Transactions
Issue: If a transaction already exists in the system, Sage 200 may reject duplicate entries.
Solution: Review the data for duplicates before importing or set up the import process to ignore duplicates if appropriate.
Incorrect Nominal Codes or VAT Codes
Issue: Transactions may be rejected if the nominal codes or VAT codes are invalid or don’t exist in the system.
Solution: Verify that all nominal and VAT codes are correct and exist in Sage 200 before importing.
Date Format Issues
Issue: Sage 200 may reject data if the date format in the file is inconsistent with the system settings.
Solution: Ensure that dates in the file are in the correct format as per the regional settings of Sage 200: using DD/MM/YYYY instead of MM/DD/YYYY.
Currency Mismatch
Issue: If the transaction data involves multiple currencies, a mismatch between the file and the currency settings in Sage 200 can cause issues.
Solution: Ensure that the currency codes in the import file align with those in Sage 200.
Transaction Type Errors
Issue: If the wrong transaction type (e.g., sales vs. purchase transactions) is used, Sage 200 may reject the data.
Solution: Verify that the correct transaction types are specified for each entry. Be sure to check the example file for how this is formatted as a number allocation is used as a reference for each module/transaction type.
These are the most common errors you may experience, but if at any point you require assistance our ever-ready support team will be on hand to help you.
File Examples
Having seen the end result, let’s now look at how the .xls and .csv excel files look, we’ll use Customer Transaction imports as an example:
.xls (example file)

As previously mentioned the example file provides all data required in each column, its mandatory or option status, its format, etc. It also provides examples for reference.
.csv (Import file)
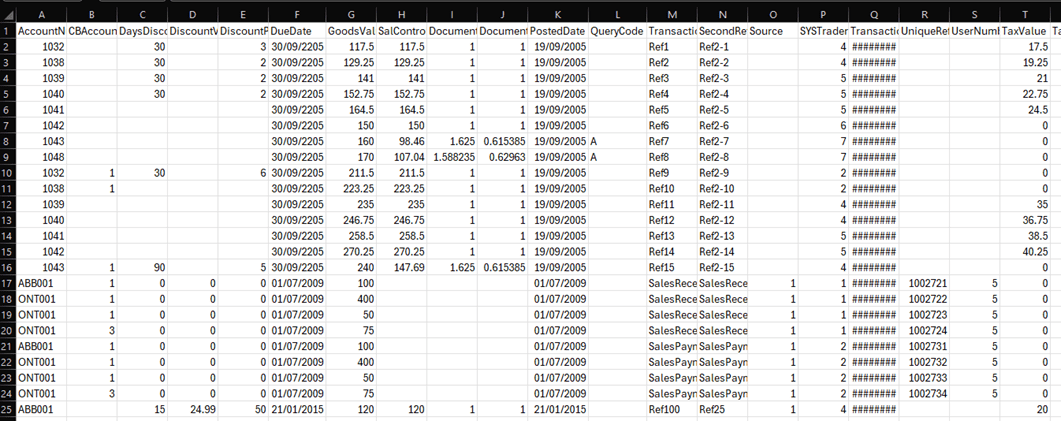
The format is the same as the example file. You can use the example file as a template to add your data to then copy and paste into the .csv import file for validation.
Conclusion
Importing data into Sage 200 Standard and Profession al is a powerful feature that can save time and enhance data accuracy for businesses. Mastering the use of templates and being aware of common pitfalls is crucial for successful data imports.
By carefully preparing data, using the right formats, and following the validation steps, users can effectively manage their data and maintain the integrity of their Sage 200 system. Whether you’re a consultant, accountant, or business owner, these tips and tricks will help you make the most of Sage 200’s importing capabilities, ensuring smooth operations and reliable data management.


Alex is one of our Sage 200 consultants. Having previously worked for Sage for several years his intimate knowledge of their business has served him well, culminating in his current position. His knowledge of accounts reaches further than just finance, having previously worked on various final accounts and tax packages offered by Sage.
Living in Manchester, his hobbies include playing guitar or bass with his bands, playing computer games with friends, sampling the local restaurant & nightlife, and relaxing with a whiskey & his cat, Ripley.